Whenever Sam and I travel through France, there is one little treat I find almost impossible to resist: canelés de Bordeaux. If we happen to pass a good French pâtisserie, chances are I’ll come out carrying a small paper bag filled with these beautiful little pastries.
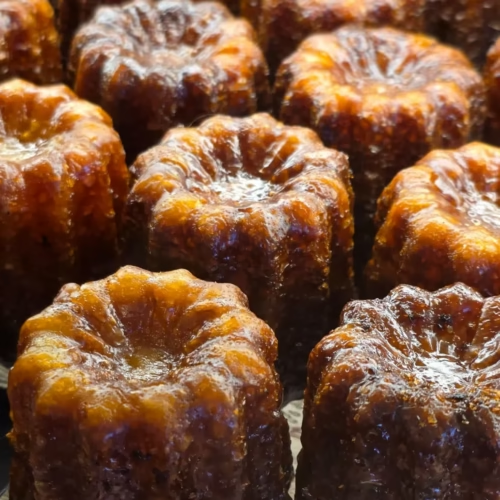
At first glance, they don’t look particularly impressive. They’re small, dark brown, and have a distinctive fluted shape. But bite through that deeply caramelized crust and you’ll discover something wonderful.
The outside is firm and slightly crisp, while the center is soft, moist, and almost custard-like. There’s the delicate fragrance of vanilla, a little warmth from the rum, and that slightly bitter sweetness you get from properly caramelized sugar.
I absolutely love them.
Sam, on the other hand, insists that he doesn’t like canelés at all. Not even a little.
These days, I make them at home, too. Once they’ve cooled, I put them away in a tin to enjoy with our coffee over the next couple of days.
Except there’s a small mystery.
Every time I open the tin, a few canelés seem to have disappeared. I’m quite certain how many I put in there, and yet the numbers never quite add up.
It’s a rather curious situation, especially in a house where someone claims not to like them.
What Are Canelés de Bordeaux?
Canelés are traditional French pastries from Bordeaux, a beautiful city in southwestern France, famous for its wines, architecture, and wonderful food.
They’re instantly recognizable by their small cylindrical shape, deep grooves, and slightly indented top.
Unlike most cakes, canelés are made from a very thin batter, closer in consistency to crêpe batter than a traditional cake mixture.
The ingredients are surprisingly simple: whole milk, sugar, flour, egg yolks, butter, vanilla, and rum. There’s no yeast or baking powder.
What makes canelés so special is what happens during baking.
The sugar caramelizes on the outside, creating a dark, slightly crisp crust, while the center remains wonderfully soft and creamy.
A proper canelé shouldn’t be light and fluffy like a cupcake. And it certainly shouldn’t be pale golden brown.
That beautiful, deep chestnut color is exactly what you’re looking for.
In Bordeaux, you’ll find canelés in several sizes. The smallest are perfect alongside an espresso, while the larger ones make a lovely afternoon treat or dessert.
The History of Canelés de Bordeaux
Like so many traditional French recipes, the canelé comes with a fascinating history. Although its exact origins remain something of a mystery, there are several stories about how these little pastries first appeared.
One of the most popular legends takes us back to the convents of Bordeaux during the seventeenth or eighteenth century.
According to the story, local winemakers used egg whites to clarify their wines, leaving them with plenty of unused egg yolks.
Rather than waste them, the yolks were supposedly given to nuns, who used them to make small pastries.
It’s a lovely story, and it certainly sounds plausible. After all, Bordeaux has been an important wine-producing region for centuries.
However, historians have never found convincing evidence that the nuns actually invented the canelé. Archaeological investigations and convent records have not established a connection with the pastry we know today.
What we do know is that Bordeaux had a tradition of baking small sweets long before the modern canelé became famous.
In the seventeenth century, local bakers known as canauliers produced a pastry called canaule. They even established their own guild in 1663.
Whether those early pastries were direct ancestors of today’s canelés remains uncertain.
The modern version, with its characteristic fluted shape, deeply caramelized crust, vanilla, and rum, became especially well known during the twentieth century.
In 1985, a group of Bordeaux pastry makers established an association dedicated to protecting and promoting the canelé as a regional specialty.
Today, these little pastries are enjoyed throughout France and have become one of Bordeaux’s most recognizable culinary treasures.
Maison Baillardran – A Bordeaux Pâtisserie Tradition
If you spend any time exploring the world of canelés, you’ll almost certainly come across the name Maison Baillardran.
Founded in Bordeaux in 1988, Baillardran specializes in traditional canelés and has become one of the city’s best-known names associated with these pastries.
What I particularly like is that they don’t just sell beautiful canelés. They also offer the traditional copper molds used to bake them.
You’ll find several sizes, including miniature, medium, and classic molds.
The small ones are wonderful for making bite-sized treats to serve with coffee. The larger molds produce a more substantial pastry, with that lovely contrast between the caramelized exterior and creamy center.
Traditional copper molds aren’t inexpensive, especially if you’re planning to buy a set of twelve. But with proper care, they can last for many years.
If you enjoy French baking and plan to make canelés regularly, they’re certainly worth considering.
Copper vs. Silicone Canelé Molds
One of the most common questions when making canelés at home is whether you really need traditional copper molds.
The short answer is no, but the material does make a difference.
Traditionally, canelés are baked in individual fluted copper molds. Copper conducts heat quickly and evenly, which helps create that distinctive dark, caramelized crust.
And the crust is really what makes a canelé special.
Without it, you’re left with something much closer to a small, soft custard cake.
Copper molds do have a few disadvantages. They’re expensive, need careful greasing, and require some maintenance. It can also take a little practice to understand exactly how they behave in your oven.
Silicone molds are more affordable, easier to store, and convenient for occasional baking.
You can certainly make lovely canelés in silicone molds, although the crust may not become quite as firm or evenly caramelized as it would in copper.
It’s also important to check the manufacturer’s maximum oven temperature, especially since canelés begin baking at a relatively high heat.
My advice? Start with a good set of molds and learn how your oven behaves.
If you eventually find yourself baking canelés regularly, traditional copper molds might be a worthwhile investment.
Why Does Canelé Batter Need to Rest Overnight?
One of the most important steps in making canelés happens before you even turn on the oven.
The batter needs to rest in the refrigerator for at least twelve hours.
That might seem like a long time for something made with milk, flour, sugar, and egg yolks, but there’s a good reason for it.
Resting allows the flour to absorb the liquid properly, creating a more uniform batter. It also gives the vanilla and rum time to develop and blend with the other ingredients.
Another important detail is how you mix the batter.
Unlike sponge cakes or muffins, canelés don’t need lots of air beaten into them.
In fact, you want to avoid incorporating too much air. The goal is a dense, tender, almost custard-like center rather than a light and fluffy cake.
The following day, simply stir the batter gently before pouring it into your prepared molds.
It’s a small detail, but one that makes a real difference to the finished pastries.
Why I Use Whole Milk, Real Vanilla, Butter, and Dark Rum
When a recipe contains only a handful of ingredients, I think their quality becomes particularly important.
For canelés, I always use whole milk. It gives the center a richer, creamier texture than low-fat milk.
Unsalted butter adds richness without introducing unnecessary salt.
And then there’s the vanilla.
I love using a real vanilla bean in this recipe. Splitting the pod, scraping out those tiny black seeds, and allowing everything to infuse in warm milk gives the batter such a lovely fragrance.
It’s one of those little pleasures of baking that I never get tired of.
For the rum, I prefer an amber or dark rum, known in France as rhum ambré.
These rums often have warm notes of vanilla, wood, and caramel, which complement the deeply browned crust beautifully.
You don’t need an expensive bottle. A decent amber rum works perfectly well.
The amount is relatively small, but the rum is an important part of the traditional flavor.
And although the pastries are baked at a high temperature, it’s worth remembering that baking doesn’t necessarily remove all the alcohol.
The Secret to Perfect Canelés Is in the Baking
Making the batter is actually the easy part.
The real challenge begins when the molds go into the oven.
A good canelé needs enough heat to develop its dark, caramelized exterior without drying out the soft center.
That’s why many traditional recipes use two baking temperatures.
The pastries begin in a very hot oven, encouraging the exterior to brown and caramelize. The temperature is then reduced, allowing the inside to finish cooking more gently.
It’s a delicate balance.
The exact baking time will depend on the size of your molds, the material they’re made from, and your oven.
Mini canelés will generally need less time than large ones, and copper molds behave differently from silicone.
One thing I’ve learned is not to be afraid of the color.
Canelés are supposed to be much darker than ordinary cakes. A pale golden canelé might look pretty, but it won’t have quite the same deep caramel flavor or distinctive crust.
Once baked, carefully remove them from their molds while they’re still warm, then transfer them to a wire rack.
As they cool, the exterior becomes firmer and the contrast with the creamy center becomes even more pronounced.
And the smell of vanilla, butter, rum, and caramel filling the kitchen?
That’s almost reason enough to make them.
When Are Canelés at Their Best?
For me, there’s no question: canelés are at their best on the day they’re baked.
That’s when the contrast between the caramelized crust and soft interior is most noticeable.
As time passes, moisture gradually moves from the center toward the outside, causing the crust to soften.
It doesn’t mean they won’t taste good the following day, but the texture will change.
If you have leftovers, store them in an airtight tin in a cool place for up to two days.
You can also refresh them by warming them briefly in the oven at around 350°F (180°C), then allowing them to cool again on a wire rack.
This can help restore some of their crispness.
Of course, storing canelés in our house comes with its own challenges.
I still love buying them whenever Sam and I visit France. There’s something wonderful about walking into a small French pâtisserie, choosing a few pastries, and enjoying them later with a good cup of coffee.
But making them at home has become one of my favorite little baking traditions.
Especially when the kitchen smells of warm vanilla and caramel, and the first canelé is just cool enough to eat.
As for Sam, he still maintains that he doesn’t particularly care for them.
Which makes the disappearing canelés all the more mysterious.
Perhaps next time I’ll leave a little note inside the tin with the exact number I’ve baked.
Just to keep track, you understand.
Canelés de Bordeaux
Ingredients
- 1 cup plus 1 teaspoon 250 ml whole milk
- 1 vanilla bean
- ⅝ cup 125 g superfine sugar (caster sugar)
- ½ cup plus 1 teaspoon 65 g all-purpose flour
- 3 large egg yolks
- 1 tablespoon plus 2 teaspoons 25 g unsalted butter
- 1 tablespoon plus 2 teaspoons 25 ml amber or dark rum (rhum ambré)
- Extra unsalted butter for greasing the molds
Instructions
The Day Before – Preparing the Batter
- Infuse the milk with vanilla. Split the vanilla bean lengthwise and scrape out the seeds. Place the whole milk, vanilla seeds, and empty pod in a saucepan. Heat until the milk is just about to boil, then remove from the heat. Allow the vanilla to infuse for approximately 15 minutes.
- Combine the dry ingredients. Meanwhile, combine the superfine sugar and flour in a mixing bowl. Add the egg yolks and stir with a whisk until the mixture is smooth.
- Add the warm milk. Remove the vanilla pod from the milk. Gradually pour the warm milk into the egg yolk mixture, stirring gently as you go. Try to incorporate as little air as possible into the batter.
- Add the butter and rum. While the batter is still warm, add the unsalted butter and stir until completely melted. Then mix in the rum.
- Rest the batter overnight. If necessary, pour the batter through a fine-mesh sieve to remove any lumps. Allow it to cool, cover, and refrigerate for at least 12 hours.
The Next Day – Baking the Canelés
- Preheat the oven. Preheat your oven to 425°F (220°C), using conventional heat rather than convection. If using silicone molds, check that they are suitable for this temperature.
- Prepare the molds. Carefully grease the canelé molds with a thin layer of softened unsalted butter. Make sure all the fluted grooves are evenly coated. Place the molds on a sturdy baking sheet.
- Stir the batter. Remove the batter from the refrigerator and stir gently. Some of the ingredients may have settled during the overnight resting period.
- Fill the molds. Divide the batter among the prepared molds, filling each approximately three-quarters full. This allows room for the batter to rise during baking.
- Begin baking. Place the baking sheet in the preheated oven. Bake large canelés for the first 15 minutes at 425°F (220°C).
- Reduce the temperature. Lower the oven temperature to 320°F (160°C) and continue baking for approximately 45 minutes. The exterior should be a deep chestnut brown with a well-caramelized crust. Exact baking times may vary depending on your oven and the material of your molds.
- Remove from the molds. Take the molds out of the oven and let them stand briefly. Carefully unmold the canelés while the molds are still warm. Be extremely careful, as the molds will be very hot.
- Cool completely. Transfer the canelés to a wire rack and allow them to cool completely. The exterior will become firmer as they cool.
- Important: Baking Mini Canelés
- The baking time of 15 minutes at 425°F (220°C), followed by approximately 45 minutes at 320°F (160°C), is intended for large canelés.
- For mini canelés, this total baking time is generally too long. Begin checking them earlier and adjust the baking time according to the size and material of your molds.